A R T I S T S T A T E M E N T
The art of creating a linoleum block print was tedious, but quite fun, it's a long process that takes a lot of effort, but the product is satisfactory. Since I enjoyed it so much, I'd like to tell you how to create your own.
The process is as follows: Come up with an image or sketch on a piece of paper. Once you've done that, color the back of your paper with a piece of charcoal, make sure you cover where ever your image is on the front of the page, for example, if your image is focused around the center of the page, charcoal that specific area, but if your image takes up the entirety of the page, charcoal the entire thing. Using a linoleum block, which is what you'll use to create your relief print, place your paper charcoal side down and trace the image again by simply going over the image you've already created. Once the image is printed on the linoleum, use a gouge to trace out any areas you don't wish to be seen in the final print. When done, you may want to print a trial print in order to see if the print is the way you'd want it to be. Once you are happy with it, use a brayer to place ink on the block and place your paper on it, or, you could use a printing press. Finally, sign an impression number, which is the number of prints you made and the current print you are on, and your signature. And viola!
Some techniques I used were to use my palms to press down on my paper instead of using a brayer to flatten the ink on my page. In result, it gave my prints a textured look similar to leather. I also chose to roll various colors of ink on my block in order to get an array of colors when I printed.
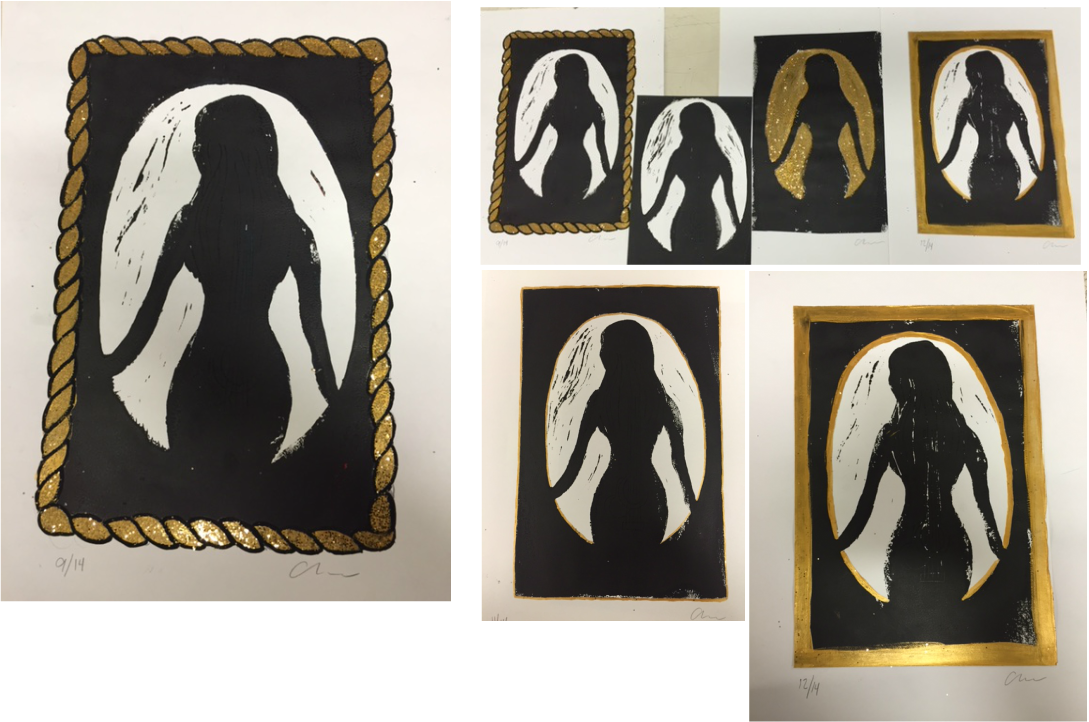
As for my image, I chose to go with a silhouette of a woman inside a cutout. It was an image I had created prior to the I really enjoyed, she was crafted from that of a guitar to symbolize how music is a part of who we are. The only thing was, the more I printed, the more her fine details disappeared, by one of my final prints, you could see the raised impression of where her lines once were. But, I think it benefited my print because I enjoyed that image and the look it created.
The process is as follows: Come up with an image or sketch on a piece of paper. Once you've done that, color the back of your paper with a piece of charcoal, make sure you cover where ever your image is on the front of the page, for example, if your image is focused around the center of the page, charcoal that specific area, but if your image takes up the entirety of the page, charcoal the entire thing. Using a linoleum block, which is what you'll use to create your relief print, place your paper charcoal side down and trace the image again by simply going over the image you've already created. Once the image is printed on the linoleum, use a gouge to trace out any areas you don't wish to be seen in the final print. When done, you may want to print a trial print in order to see if the print is the way you'd want it to be. Once you are happy with it, use a brayer to place ink on the block and place your paper on it, or, you could use a printing press. Finally, sign an impression number, which is the number of prints you made and the current print you are on, and your signature. And viola!
Some techniques I used were to use my palms to press down on my paper instead of using a brayer to flatten the ink on my page. In result, it gave my prints a textured look similar to leather. I also chose to roll various colors of ink on my block in order to get an array of colors when I printed.
As for my image, I chose to go with a silhouette of a woman inside a cutout. It was an image I had created prior to the I really enjoyed, she was crafted from that of a guitar to symbolize how music is a part of who we are. The only thing was, the more I printed, the more her fine details disappeared, by one of my final prints, you could see the raised impression of where her lines once were. But, I think it benefited my print because I enjoyed that image and the look it created.